How to present your entries:
Refer also to the competition rules
Digital images:
Digital Images must be in jpeg format and are restricted to a maximum pixel size. Your image should be re-sized to a maximum width and height of 1600px by 1200px in landscape format. For portrait format, the maximum 1200px height still applies. Images with larger dimensions than these will be rejected by Photo Entry. The normal resolution for projected images is 96px per inch, and the colour profile should be sRGB.
There’s advice at the bottom of the page if you’re not sure how to achieve this.
You will need to give the picture a title, which you'll enter into Photo Entry.
When you open up Photo Entry (click here to open it) using your personal access password, you will see "2025/2026 Club Competitions" under the "Main Menu". When you click on this title you get the list of competitions which are currently available to enter. Just click on the one you want and at the bottom of the page there's a box titled "Add New Entry"...click on this and enter the title of the first image. Follow the on-screen instructions to allow your image to be uploaded. Then go on and add a second title and image.
If you need more detailed instructions, they're here.
Prints:
Prints must be mounted on board sized 50 cm x 40 cm. (anything larger won’t fit into the box which goes to the judge). The actual print within the mount can be any size.
All Prints entered should have the title on the reverse side, but the member’s name should not be shown on the print. Members are asked to submit their entries in an appropriate bag or cover with their name on it.
While the Club will make every effort to ensure the safekeeping of prints submitted for competitions or exhibitions, the Club can accept no liability for any loss or damage. After the monthly competitions, the prints are considered for inclusion in the club's external competition entries. If they’re not selected, then they’ll be made available for the owner to collect.
Need to get your images printed? We'll have sessions where you can make your prints on the club's printer. Alternatively, we have a discount code for having them done at Loxley Colour. Here are some tips on using Loxley Colour.
As well as handing in your prints, we require the image to be loaded onto the Photo Entry system. Just upload a jpeg following the same routine as for digital images. It will be the print which is judged, but the digital submission is a useful reference for the judge and the club.
---------------------------------
How to size digital images for competition
Here’s some advice which should work on most image editing programs.
First, crop your picture to the shape you want to enter.
To create the image file to be entered, you'll have to use the 'resize' feature. If you're using Lightroom Classic or Photoshop, it's built into the Export menu.
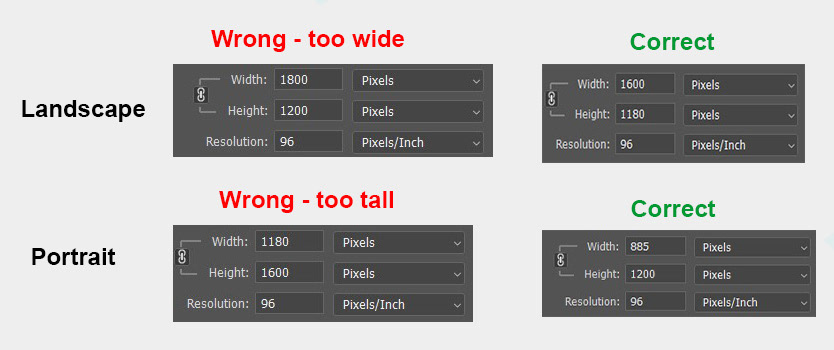
Firstly, if you get the option, set the resolution at 96 pixels per inch. Then set the height to 1200 pixels. The width should then be calculated automatically. (If there's a 'constrain ratio' option, make sure that's set to yes).
If the width which results is more than 1600 pixels (i.e. it’s in a landscape format narrower than 4x3 aspect ratio) then change the width to 1600px. The height will then change to less than 1200px.
Here’s some advice which should work on most image editing programs.
First, crop your picture to the shape you want to enter.
To create the image file to be entered, you'll have to use the 'resize' feature. If you're using Lightroom Classic or Photoshop, it's built into the Export menu.
Firstly, if you get the option, set the resolution at 96 pixels per inch. Then set the height to 1200 pixels. The width should then be calculated automatically. (If there's a 'constrain ratio' option, make sure that's set to yes).
If the width which results is more than 1600 pixels (i.e. it’s in a landscape format narrower than 4x3 aspect ratio) then change the width to 1600px. The height will then change to less than 1200px.
Lightroom Classic users can download this export preset which will resize images correctly.
For Affinity Photo users, the routine is slightly different in that the resizing has to be done before you enter the Export function.
In the Photo Persona, resize the image to 1600 pixels x 1200 pixels (or other size required).
Select Document > Resize Document
In the Resize Document window, check that the padlock is locked (to preserve the proportions of the image) and that the units are set to pixels.
Type in 1600 in the first box and press enter. If the changed value in the 2nd box is greater than 1200, then overtype it with 1200 and press enter.
Once that's done, export/save-as the image as a jpeg, setting the filename as the title you’re giving your entry. You should use the sRGB profile if that option appears.In the Photo Persona, resize the image to 1600 pixels x 1200 pixels (or other size required).
Select Document > Resize Document
In the Resize Document window, check that the padlock is locked (to preserve the proportions of the image) and that the units are set to pixels.
Type in 1600 in the first box and press enter. If the changed value in the 2nd box is greater than 1200, then overtype it with 1200 and press enter.
And that's it. From there, upload your image onto the Photo Entry system as described above.